In this post, I will show you how to implement Spring JPA One-to-One bidirectional mapping with Hibernate in Spring Boot with an example using @OneToOne annotation.
What you need
- JDK 8+ or Open JDK 8+
- Spring Boot 2.7.2 or above
- Maven 3+
- MySql Server 5+
- Your favorite IDE
What you will learn
- How to set up a Spring Boot project.
- How to define Data Models and Repository interfaces.
- How to configure Spring Data, JPA, and Hibernate to work with different databases.
- How to use the CommandLineRunner interface to add data on application start-up.
- How to use @OneToOne annotation.
Let’s consider an application where the idea is to map the model of a college with students taking courses given by teachers. Here is what this model looks like:
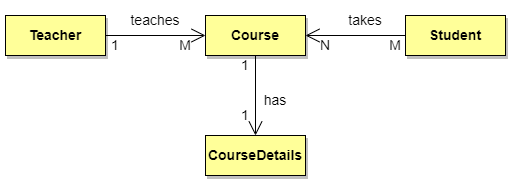
As we can see, there are a few classes. These classes have relationships between them. In this post, we will be taking only the Course and CourseDetails classes. By the end of this post, we’ll have mapped those classes to database tables, preserving their relationships.
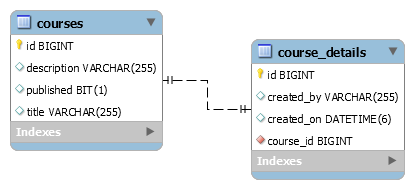
We’re gonna create a Spring Boot project from scratch, then we implement JPA/Hibernate One to One Bidirectional Mapping with the courses and the course_details table as follows:
Also, check JPA / Hibernate One to Many Mapping Example with Spring Boot
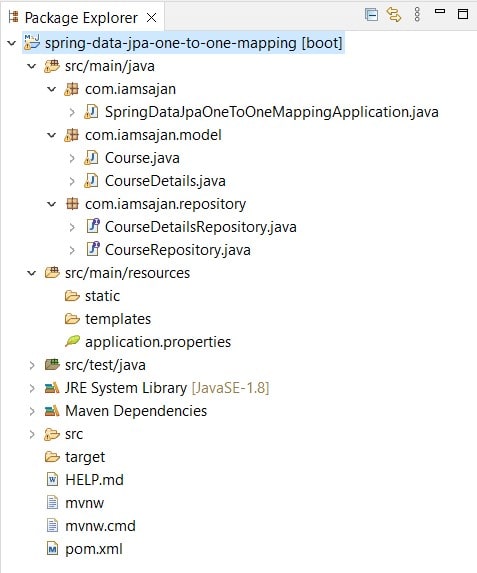
Project Structure
Project Dependencies
We will use the following dependencies.
- spring-boot-starter-data-jpa
- spring-boot-starter-web
- mysql-connector-java
<dependency>
	<groupId>org.springframework.boot</groupId>
	<artifactId>spring-boot-starter-data-jpa</artifactId>
</dependency>
<dependency>
	<groupId>org.springframework.boot</groupId>
	<artifactId>spring-boot-starter-web</artifactId>
</dependency>
<dependency>
	<groupId>mysql</groupId>
	<artifactId>mysql-connector-java</artifactId>
	<scope>runtime</scope>
</dependency>
Configure Spring Datasource, JPA, Hibernate
Under the src/main/resources folder, open application.properties to configure the Spring Datasource JDBC URL, username, and password of your local MySql Server.
#Database configuration sql
spring.datasource.url= jdbc:mysql://localhost:3306/testdb?useSSL=false
spring.datasource.username= root
spring.datasource.password=

#Hibernate configuration
spring.jpa.hibernate.ddl-auto= update
spring.jpa.properties.hibernate.dialect= org.hibernate.dialect.MySQL8Dialect
Create the testdb database in your local MySQL server if not exists. That is all that we need to do with the database server.
We don’t have to create table schemas, the spring.jpa.hibernate.ddl-auto=update configuration allows JPA and Hibernate does that based on the entity-relationship mappings.
spring.jpa.properties.hibernate.dialect is optional and can be used to specify the current database dialect to let it generate better SQL queries for that database.
Defining the Models
Let’s now define the model(entities) classes that will be mapped to the tables we saw earlier.
- Course Model(Entity)
The Course model class has four fields: id, title, description, and published. Create the model package and then the Course class inside the model package with the following contents.
package com.iamsajan.model;

import java.io.Serializable;
import javax.persistence.*;

@Entity
@Table(name = "courses")
public class Course implements Serializable {
	@Id
	@GeneratedValue(strategy = GenerationType.IDENTITY)
	private Long id;

	@Column(name = "title")
	private String title;

	@Column(name = "description")
	private String description;

	@Column(name = "published")
	private boolean published;

	@OneToOne(fetch = FetchType.LAZY, cascade = CascadeType.ALL, mappedBy = "course")
	private CourseDetails courseDetails;

	// Hibernate requires a no-argument constructor
	public Course() {
	}

	public Course(String title, String description, boolean published) {
		this.title = title;
		this.description = description;
		this.published = published;
	}

	// Getters and Setters (Omitted for brevity)
	// You can generate getter and setter using shortcut key Alt+Shift+s on Eclipse
	// and STS
}
- CourseDetails Model(Entity)
The CourseDetails model class has three fields: id, createdBy, and createdOn. Create the CourseDetails class inside the model package with the following contents.
package com.iamsajan.model;

import java.io.Serializable;
import java.util.Date;
import javax.persistence.*;

@Entity
@Table(name = "course_details")
public class CourseDetails implements Serializable {
	@Id
	@GeneratedValue(strategy = GenerationType.AUTO)
	private Long id;

	@Column
	private Date createdOn;

	@Column
	private String createdBy;

	@OneToOne(fetch = FetchType.LAZY)
	@JoinColumn(name = "course_id")
	private Course course;

	// Hibernate requires a no-argument constructor
	public CourseDetails() {
	}

	public CourseDetails(String createdBy) {
		this.createdOn = new Date();
		this.createdBy = createdBy;
	}

	// Getters and Setters (Omitted for brevity)
	// You can generate getter and setter using shortcut key Alt+Shift+s on Eclipse
	// and STS

}
Defining the Repositories
Let’s now define the repositories interfaces for Course and CourseDetails as CourseRepository and CourseDetailsRepository. Both interfaces extend the repositories from Spring Data JPA’s JpaRepository interface.
- CourseRepository
Create the repository package and then the CourseRepository interface inside the repository package with the following contents.
package com.iamsajan.repository;

import org.springframework.data.jpa.repository.JpaRepository;
import org.springframework.stereotype.Repository;

import com.iamsajan.model.Course;

@Repository
public interface CourseRepository extends JpaRepository<Course, Long> {

}
- CourseDetailsRepository
Create the CourseDetailsRepository interface inside the repository package with the following contents.
package com.iamsajan.repository;

import org.springframework.data.jpa.repository.JpaRepository;
import org.springframework.stereotype.Repository;

import com.iamsajan.model.CourseDetails;

@Repository
public interface CourseDetailsRepository extends JpaRepository<CourseDetails, Long> {

}
That’s all we need to do because of SimpleJpaRepository, Which implements all the methods to perform CRUD operations on Course and CourseDetails entities. JpaRepository interface called SimpleJpaRepository which is plugged in at runtime.
Creating data with JPA and Hibernate
I’ve implemented CommandLineRunner interface in the main class to run some code once the application has started. Open your main class in my case (SpringDataJpaOneToOneMappingApplication.java) and add the following contents.
package com.iamsajan;

import org.springframework.beans.factory.annotation.Autowired;
import org.springframework.boot.CommandLineRunner;
import org.springframework.boot.SpringApplication;
import org.springframework.boot.autoconfigure.SpringBootApplication;

import com.iamsajan.model.Course;
import com.iamsajan.model.CourseDetails;
import com.iamsajan.repository.CourseDetailsRepository;
import com.iamsajan.repository.CourseRepository;

@SpringBootApplication
public class SpringDataJpaOneToOneMappingApplication implements CommandLineRunner {

	@Autowired
	private CourseRepository courseRepository;


	public static void main(String[] args) {
		SpringApplication.run(SpringDataJpaOneToOneMappingApplication.class, args);
	}

	@Override
	public void run(String... args) throws Exception {


		// Create a Course instance
		Course course = new Course("Spring Boot", "Spring Boot Jpa Hibernate one to one bidirectional mapping", true);

		// Create a CourseDetails instance
		CourseDetails courseDetails = new CourseDetails("Sajan K.C.");

		// Set child reference(courseDetails) in parent entity(course)
		course.setCourseDetails(courseDetails);

		// Set parent reference(course) in child entity(courseDetails)
		courseDetails.setCourse(course);

		// Save Parent Reference which will save the child as well
		courseRepository.save(course);
	}
}
You can also clean up your database tables by adding the following line of code inside the run method. Also, don’t forget to Autowire CourseDetailsRepository.
// Clean up database tables
courseDetailsRepository.deleteAllInBatch();
courseRepository.deleteAllInBatch();
Run and Test
Right-click on the project and select Run as > Java Application.
Or you can use a terminal to run the application from the root directory as follows:
mvn spring-boot:runConclusion
Today we’ve built a Spring Boot example using Spring Data JPA, Hibernate One to One relationship with MySQL.
Source code
In my GitHub repository, you can find the source code for the sample project we build in this post.
Keywords: spring boot one to one, one to one jpa, one to one spring boot, onetoone spring boot, one to one jpa, hibernate one to one mapping, hibernate one to one, one to one hibernate.

Pingback: JPA / Hibernate One to Many Mapping Example with Spring Boot - Sajan K.C.